
| 일 | 월 | 화 | 수 | 목 | 금 | 토 |
|---|---|---|---|---|---|---|
| 1 | ||||||
| 2 | 3 | 4 | 5 | 6 | 7 | 8 |
| 9 | 10 | 11 | 12 | 13 | 14 | 15 |
| 16 | 17 | 18 | 19 | 20 | 21 | 22 |
| 23 | 24 | 25 | 26 | 27 | 28 | 29 |
| 30 |
- 머신러닝
- cpp
- 자바
- 기계학습
- 클러스터링
- Machine Learning
- 코드트리
- NumPy
- 코딩테스트실력진단
- 데이터 마이닝
- 차원축소
- 합성곱 신경망
- Design Pattern
- 넘파이 기초
- c++
- python
- java
- numpy 기초
- 네트워크 기초
- cpp class
- lambda
- 코딩테스트
- 코테
- OOP
- ack
- 파이썬
- 넘파이
- 데이터 분석
- 넘파이 배열
- 디자인 패턴
- Today
- Total
준비하는 대학생
[Design Pattern] Command Pattern(커맨드 패턴) 본문
Command Pattern이란?
Command Pattern은 행동(behavioral) 디자인 패턴 중 하나로, 요청 자체를 객체화 하는 것을 목표로 합니다. 이 패턴은 요청이 서로 다른 사용자, 시간 또는 프로젝트에 따라 달라질 수 있을 때 유용합니다. 이러한 요청을 객체로 만들면, 요청을 큐에 저장하거나 로그로 기록하고 재실행할 수 있습니다.
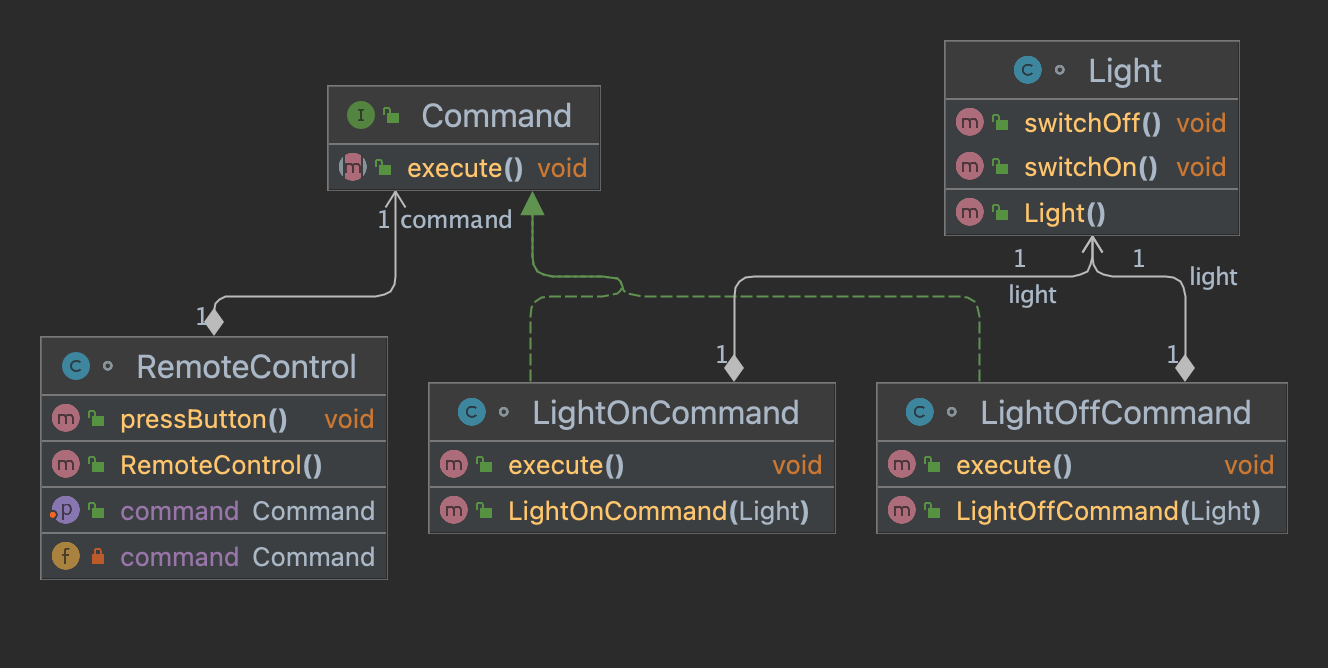
Command Pattern의 구조
Command Pattern에는 다음과 같은 4가지 주요 요소가 있습니다.
- Command: 이 인터페이스는 execute() 메서드를 선언하여 Receiver에서 수행할 연산을 구체화하는 방법을 정의합니다.
- ConcreteCommand: Command 인터페이스를 구현하고, 이를 통해 Receiver 클래스의 함수를 호출합니다. 이 함수 호출은 일반적으로 execute() 함수에서 수행됩니다.
- Invoker: 사용자의 요청을 Command 객체로 변환하며, 이 객체를 저장하고 실행하는 역할을 합니다.
- Receiver: 요청을 수행하는 데 필요한 실제 작업을 구현한 클래스입니다.
Command Pattern의 예제
직접 코드를 통해 Command Pattern을 이해하는 것이 가장 좋을 것 같습니다. 여기 간단한 예제를 들어 보겠습니다.
// Command Interface
public interface Command {
    void execute();
}

// Concrete Commands
public class LightOnCommand implements Command {
    Light light;

    public LightOnCommand(Light light) {
        this.light = light;
    }

    public void execute() {
        light.switchOn();
    }
}

public class LightOffCommand implements Command {
    Light light;

    public LightOffCommand(Light light) {
        this.light = light;
    }

    public void execute() {
        light.switchOff();
    }
}

// Receiver
public class Light {
    public void switchOn() {
        System.out.println("Light is on");
    }
    public void switchOff() {
        System.out.println("Light is off");
    }
}

// Invoker
public class RemoteControl {
    private Command command;

    public void setCommand(Command command) {
        this.command = command;
    }

    public void pressButton() {
        command.execute();
    }
}
위 예제에서 우리는 LightOnCommand와 LightOffCommand 두 가지 Command 인터페이스의 구현을 보았습니다. 이들은 execute() 메소드를 통해 실제 작업을 수행합니다.
Light 클래스는 실제 작업을 수행하는 Receiver로, 불을 켜고 끄는 switchOn()와 switchOff() 메서드를 가지고 있습니다.
RemoteControl 클래스는 Invoker로서, Command 인터페이스를 사용하여 요청을 저장하고, pressButton() 메서드를 통해 요청을 실행합니다.
// 인스턴스 생성
Light light = new Light();
Command onCommand = new LightOnCommand(light);
Command offCommand = new LightOffCommand(light);

// Invoker 생성 및 커맨드 설정
RemoteControl remote = new RemoteControl();
remote.setCommand(onCommand);
remote.pressButton(); // Light is on

remote.setCommand(offCommand);
remote.pressButton(); // Light is off
여기에서는 불을 켜고 끄는 커맨드를 생성하고, 리모컨을 통해 이 커맨드를 실행하는 방법을 보여줍니다. 이렇게 하면 리모컨은 어떤 커맨드가 할당되었는지, 그리고 그 커맨드가 어떻게 실행되는지 알 필요가 없습니다.
람다 표현식 또는 메서드 참조 적용
Java 8 이후부터 람다식과 메서드 참조을 도입하면서, 이를 사용해 Command 패턴을 더욱 간결하게 구현할 수 있게 되었습니다.
이를 사용하면, 구체적인 Command 클래스를 매번 생성하지 않고, 함수형 인터페이스를 통해 Command를 정의할 수 있습니다. 이 방법은 코드를 간결하게 만들고, 유지보수를 용이하게 합니다.
아래에 람다식과 메서드 참조를 활용한 Command 패턴의 예제를 들어 보겠습니다.
// Command Interface
public interface Command {
    void execute();
}

// Receiver
public class Light {
    public void switchOn() {
        System.out.println("Light is on");
    }
    public void switchOff() {
        System.out.println("Light is off");
    }
}

// Invoker
public class RemoteControl {
    private Command command;

    public void setCommand(Command command) {
        this.command = command;
    }

    public void pressButton() {
        command.execute();
    }
}

public class CommandDemo{
    public static void main(String[] args) {
        // 사용 예제
        Light light = new Light();

        RemoteControl remote = new RemoteControl();

        // 람다 표현식
        remote.setCommand(() -> light.switchOn());
        remote.pressButton(); // Light is on

		remote.setCommand(() -> light.switchOff());
        remote.pressButton(); // Light is off
        // 메서드 참조
        remote.setCommand(light::switchOn);
        remote.pressButton(); // Light is on

        remote.setCommand(light::switchOff);
        remote.pressButton(); // Light is off
    }
}
이렇게 하면 Command 인터페이스를 구현하는 ConcreteCommand 클래스를 따로 만들지 않아도 됩니다. 그 대신, 람다식과 메서드 참조를 사용하여 특정 메서드를 Command로 설정할 수 있습니다. 이는 코드의 간결성과 유연성을 높여줍니다.
하지만 이런 방법은 간단한 Command에만 적합하다는 점을 주의해야 합니다. 더 복잡한 로직이 필요한 경우에는 여전히 별도의 ConcreteCommand 클래스를 만드는 것이 좋습니다.
Command Pattern의 장단점
장점
- 요청 발신자와 수신자 사이의 결합도를 낮춥니다. 이는 요청이 발신자와 수신자 사이에 직접적인 연결이 없다는 것을 의미합니다.
- 요청을 쉽게 추가하거나 수정할 수 있습니다. 새로운 요청은 Command 클래스를 상속받아 새로운 클래스를 만드는 것으로 추가할 수 있습니다.
- 요청을 저장하거나, 로그를 남기는 등의 작업을 쉽게 수행할 수 있습니다.
- 실행 취소와 재실행 같은 기능을 제공하기가 수월합니다.
단점
- 각각의 개별 요청에 대해 Command 클래스를 만들어야하기 때문에, 클래스가 많아질 수 있습니다.
- 고수준의 코드 복잡성이 증가할 수 있습니다.
Command Pattern의 적용
Command Pattern은 여러분이 구현할 수 있는 많은 상황에 적용할 수 있습니다. 이 패턴은 유저 인터페이스 버튼, 사용자 입력 검증, 작업 큐 등 다양한 상황에서 사용할 수 있습니다. 이 패턴을 활용하면 애플리케이션에서 발생하는 모든 종류의 요청을 쉽게 관리하고 제어할 수 있습니다.
결론
Command Pattern은 코드의 유지보수와 확장성을 향상시키는 데 도움을 줍니다. 이 디자인 패턴은 시스템에서 발생하는 다양한 요청을 캡슐화하여 요청의 실행을 보다 유연하게 관리할 수 있게 해줍니다. 물론 모든 상황에 적합한 것은 아니지만, 알맞은 상황에서 잘 활용하면 매우 강력한 도구가 될 수 있습니다.
'Programming > Design pattern' 카테고리의 다른 글
| [Design Pattern] Facade Pattern(퍼사드 패턴) (0) | 2023.06.08 |
|---|---|
| [Design Pattern] Adapter Pattern(어댑터 패턴) (0) | 2023.06.02 |
| [Design Pattern] Singleton Pattern(싱글턴 패턴) (0) | 2023.06.02 |
| [Design Pattern] 데코레이터 패턴(Decorator Pattern) (0) | 2023.04.10 |
| [Design Pattern] Observer Pattern(옵저버 패턴) (0) | 2023.03.29 |